
Once in your lifetime, you will surely come across a ‘DNS server not responding.’ Also, you cannot even access a website without accessing the DNS or Domain Name Server. So, when you come across the problem, the DNS server is not responding, meaning the decentralized naming systems in charge of turning hostnames to IPS addresses have failed to respond. There is a myriad of reasons why you are facing this problem.
Hence, in this article, we will talk about the DNS server not responding and its solutions. Below we have listed the best solutions to fix this problem.
The simplest solution to this problem is simply by restarting your computer. Or, you can even change your browser. Most of the solutions are simple, and even a novice can fix this problem. You do not have to be an IT expert to solve this petty issue.
Below we have explained the term ‘DNS server not responding’ and the causes underlining this problem. We have also explained the best solutions for this problem. We will show you how to fix this problem both in different Windows versions as well as macOS. Therefore, scroll down to know more.
Table of Contents
What does “DNS server not responding” means?
If you have been wondering how to fix the DNS server not responding, we have listed the solutions below. But, first, let’s know what exactly does this means. You obviously cannot solve a mathematics problem without knowing the solution and methods.
A DNS server is a translator. It translates alphanumeric hostnames into numeric IP addresses. Say, for example, a site name is xyz1.com. DNS server changes the hostname into an IP address like 178.012. 326.200. The IP address helps different computers to function and communicate properly.
When you enter a web address into the browser’s search box, it is then forwarded to a DNS server first. On the DNS server, the hostname is changed, dissolved, and returned to an IP address. If the DNS server is unable to complete this name resolution activity, then the message DNS server not responding will flash on the screen.
‘DNS server not responding’ means that your computer could not establish a connection with the internet connection. In general, this error is chiefly caused by user end’s problems. The problems could with the internet connection or misconfigured Domain Name Server settings, or it could also be an outdated browser. The DNS unavailability also could be due to temporary server outrage.
Hence, the most basic solution to such an error is switching browsers or restarting your computer. Now, if the error persists after you have tried these necessary solutions, then you can also try changing your DNS server, disabling connections, or you can even clear the DNS cache.
Below we have listed the best solutions to this error. Go through the solutions and select the best solution. These solutions have helped most users and ought to help you. Hence, get going.
Top Methods to solve “DNS server not responding”
I hope you have understood what this particular message means. Now, it is time to look at the methods for solving this issue. So, let’s look at the potential ways by which you can fix the DNS server that is not responding. Below methods can easily be applied to both macOS and Windows.
1. Switching to a different browser
The first and foremost step you must try is switching to a different browser. You can troubleshoot the problem by checking your DNS connections. So, the most lucid step to do that is switching to a new browser. Hence, if you are using Mozilla, then you can change to Google Chrome or Microsoft Edge.
So, if switching browsers has worked perfectly for you, then check your browser’s version. Make sure you are using only the latest version. Or, you can even try uninstalling and then reinstalling the web browser. Now, if you are still facing the issue, then you must rule out this solution. You can try other solutions from the list below.
2. Start the computer in safe mode
If the above method did not work for you, then you can surely try out this method. So, if your operating system cannot function properly, it can lead to ‘DNS server not responding.’ Hence, you may also try boosting your operating system in safe mode. You can try out this method and check whether or not the problem persists.
So, when you do this, it will limit the resources and files used for running Windows. Hence, this can be an effective way of troubleshooting problems. So, to start your Windows in safe mode, follow the steps below:
1) First of all, select the Windows button on the bottom left-hand side corner. Next, hover to the power icon.

2) Next, while holding the shift key, select Restart.
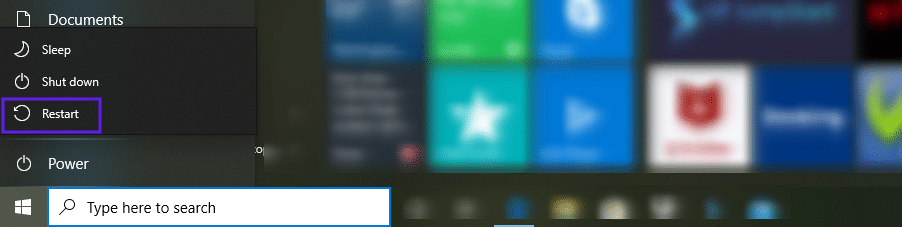
3) Then, click on Troubleshoot and then Advanced.
4) Next, click on Start-up Settings, which Restart follows.
5) Then, simply press 5 or 4 and enable Safe Mode.
6) after that, your computer will restart in the Safe Mode.
If you are using Windows 7 or any other version, you may click on the Windows icon. Then, click on the power button and then Restart. When it is booting, simply hold the F8 key.
If you use macOS, then the process is the same:
1) When macOS is booting or restarting, simply hold the Shift key.
2) Next, when the Apple logo appears on the screen, just release the key.
3) Now, your device will restart in Safe Mode.
Hence, when your operating system has restarted in Safe Mode, try opening the website again. If the problem persists, then it could be due to antivirus protection or third-party software. We have explained this solution below.
3. Temporarily deactivate your Firewall and Antivirus software
If you have tried both switching browsers and starting your computer in safe mode and failing, you can try out this method. You can try temporarily disabling your Firewall. You must note that antivirus software and firewalls are essential for your computer’s security. But, this software and firewalls can also create problems with the internet connection. Hence, creating an issue in the DNS server.
So, if you are a Windows user, then you can follow the below-mentioned steps:
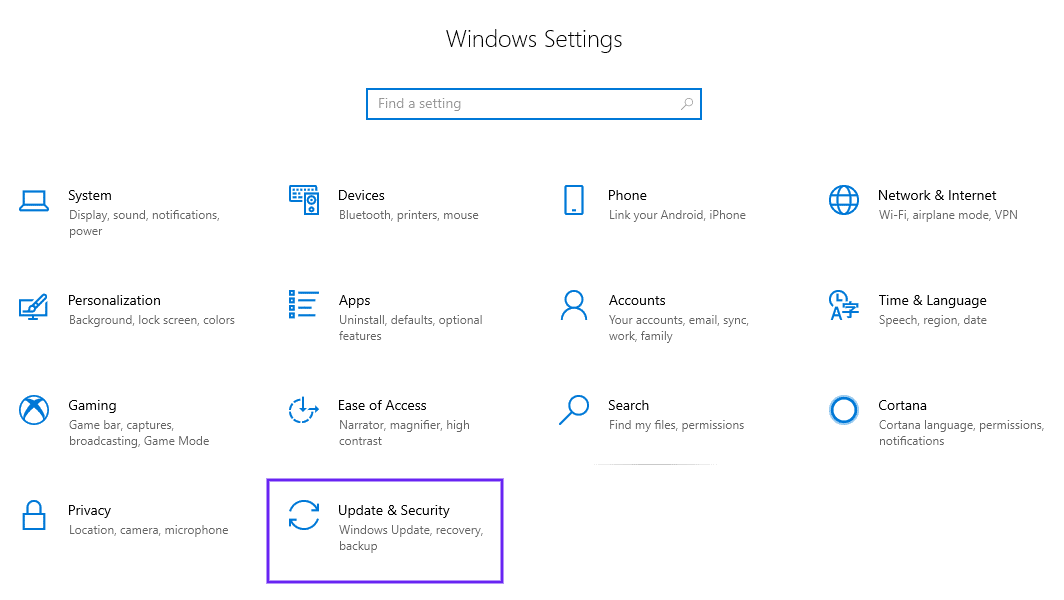
a. Go to the Control panel. Then, navigate to Update and Security.
b. Next, head to Windows Security.
c. Then, select Virus and Threat Protection.
d. after that, click on Manage Settings and then disable your antivirus software.
If you are a macOS user, then follow these steps:
a. Go to System Preferences.
b. Then, select Security and Privacy.
c. now, click on Firewall.
Once you have successfully disabled your antivirus software and Firewall, try visiting the website once more. You may also consider reconfiguring the settings or switching antivirus. Moreover, once you are done with your work, remember to reactivate your Firewall. If you have tried this method and still the problem persists, try solving the issue by following the next solution.
4. Disable your secondary connections
If the issue still isn’t solved, then you can try out this method. Mostly, deactivating the Firewall does the job. But, if that method didn’t work for you, then you can try this method as well. You can try disabling any secondary condition on your device. Simply make sure that only the connection you are using in the present moment is active.
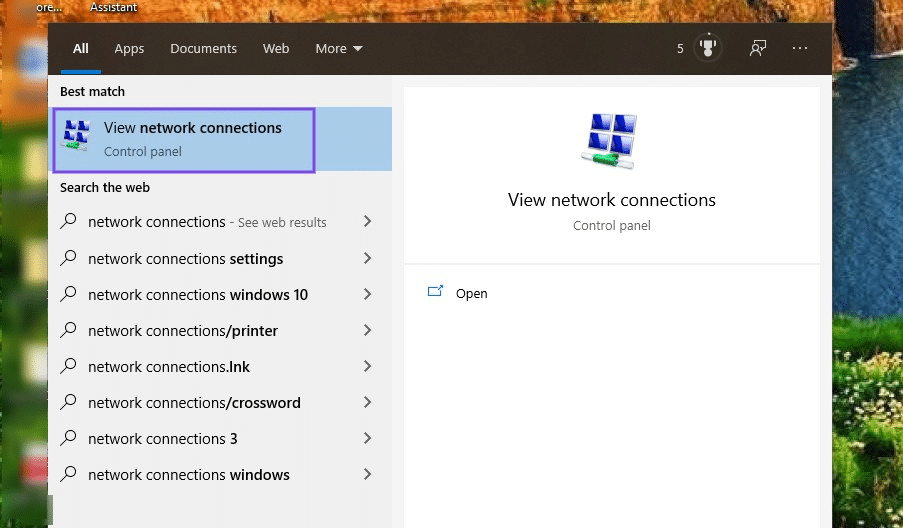
So, if you want to do this on your Windows, then on your Desktop taskbar’s search box, type “Network Connections.” Then, click on View Network Connections.
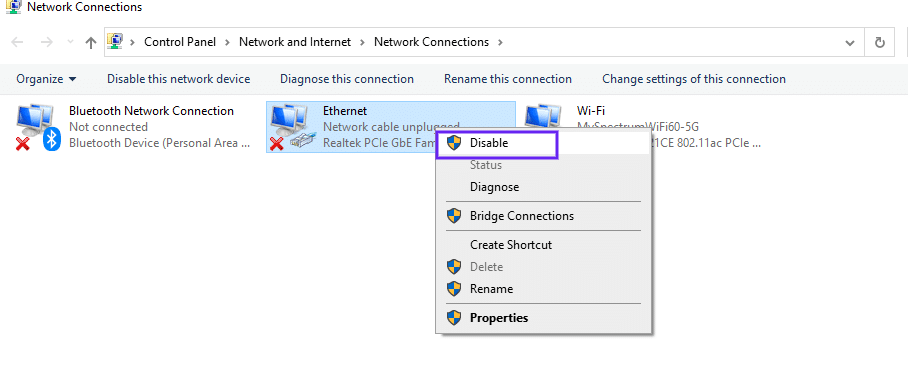
Now, the Network Connections will flash on your screen. So, any connection that you are currently not using will be marked with a red cross. Lastly, right-click on each one of them and then select Disable. Do this for all the connections that are not currently in use. Once you have completed these steps, restart your computer. Then, try revisiting the website.
In the case of macOS:
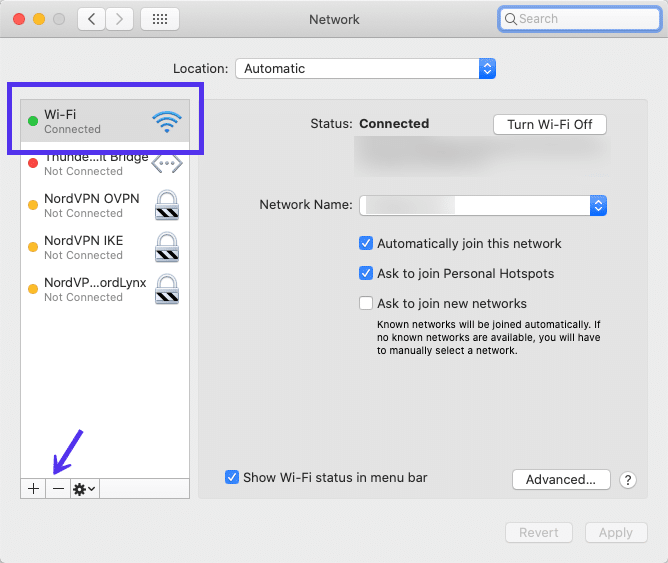
a. Click on the Apple icon.
b. Secondly, navigate to System Preferences. And then select Network.
c. Now, you will find your connections lined up on the screen’s left side.
d. So, for disabling the unused networks, select it, and then click on “- sign” on the screen’s bottom.
5. Deactivate Windows peer-to-peer connection
If both disabling Firewall and secondary connections did not work for you, then you can try the method, deactivating Windows P2P or peer-to-peer connection. Now, this is found explicitly on Windows 10. So, only if you are a Windows 10 user can only you go for this solution.
What does this feature do? Well, the P2P connection helps to preserve your computer’s download bandwidth. This is especially helpful when a Windows update is downloaded one time, and then it is spread over other computers, connected through the local Network.
Now, this process is beneficial. But, it has its disadvantages as well. Such as the DNS server issue. Hence, if you face a ‘DNS server not responding issue, you can try deactivating Windows peer-to-peer connection.
So, to do this:
a. Simply click on the Windows icon.
b. Secondly, click on Settings. Then, select Update and Security.
c. On the left-hand side of the screen, select ‘Delivery optimization.’
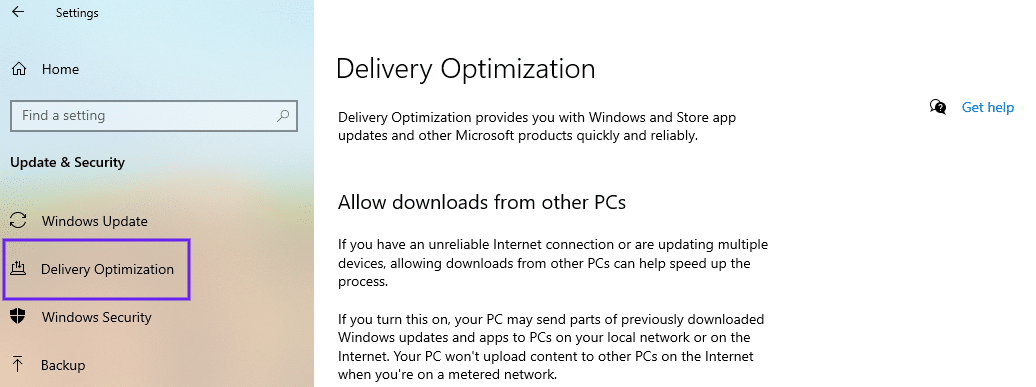
d. Now, on your screen, you will find the option ‘Allow download from other PCs.’ Switch off that option.

e. When you are done doing this, restart your computer and then revisit the website.
If this solution did not work for you, we still have many solutions lined up.
6. Restart the router
Quite a few times, we have an issue with our internet connection and router itself. Hence, in such a condition, you can simply try restarting your router. When you do this, it will thoroughly flush out the router’s cache. So, this can be a great solution to your DNS server issue.
The modern routers come with a button that you can simply press and power off the router. For restarting it, you have to press the button again. So, to solve the issue, firstly, switch off your router. Then, after a minute or two, turn on your router or modem and wait for it to establish an internet connection. So, once the connection is established, open your browser and check if you can access a website.
Note that on certain conditions, merely restarting the router is not a full-proof solution. So, you can try rebooting it by unplugging the router. Wait for a minute, plug it in, restart, and wait to establish a connection. Check whether or not the problem is resolved.
7. Try installing updated network adapter drivers on your system
Another reason you face this issue could be your present Windows network adapter driver is outdated and old. Hence, if this is the case, then simply updating the network adapter driver or getting a new one will solve the DNS server issue.
There a myriad of ways by which you can easily update your network adapter driver. One is by doing it manually. Note that it is only recommended for people who have experience with drivers. There is one alternative method as well. You can use an automated tool such as the Snappy Driver Installer or SDI, or the Driver Easy. If you do not have experience with drivers, then go for this method.

You can choose any one of the above methods, and these will recognize your system and even identify and locate the drivers. Moreover, the SDI method is excellent as it rules out human error possibilities. You won’t download or install the wrong driver, at least.
So, once you are done downloading the SDI, then finish installing the updated drivers. Then, restart your computer. After that, reconnect to your internet connection and check whether or not the problem is solved.
8. Reset your IP and flush the DNS cache
If you have changed your browser, disabled your Firewall, and even updated the network adapter drivers, and the DNS server issue is still not solving, then you can try out this method. You have to pay attention to your DNS settings now. As with your DNS cache, it could be only just your DNS needs some clearing before it establishes a proper internet connection. Moreover, it could also be the issue that your IP needs to be reset.
If you are using Windows, then start with typing ‘cmd’ in the taskbar’s search box. Now, select the Command Prompt app.
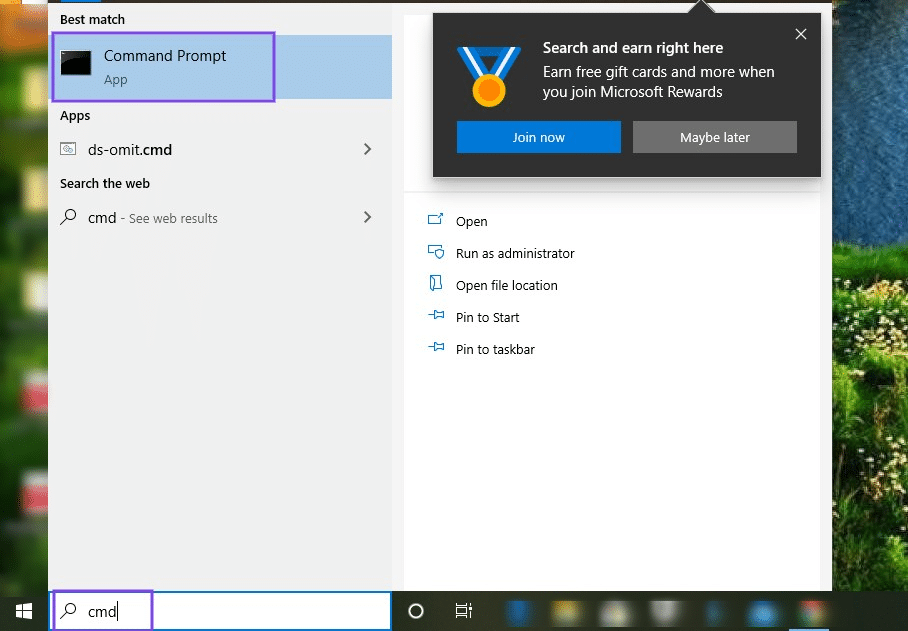
Now, a window will open. Then enter “ipconfig/flushdns” without any quotations, and then press Enter.
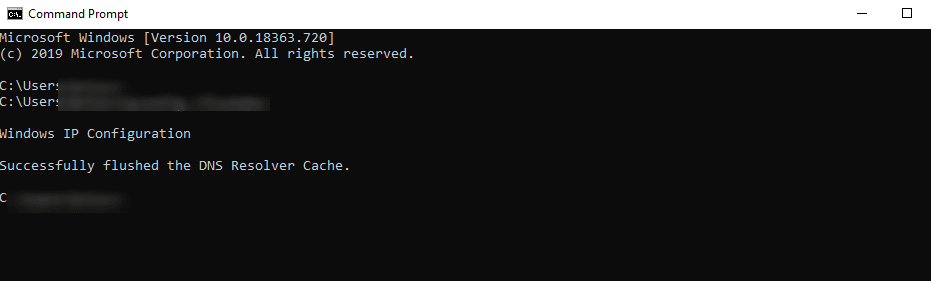
When this process is finished, a message will inform you that the DNS cache has been successfully flushed. Now, repeat this process for the following commands:
ipconfig /registerdns
ipconfig /release
ipconfig /renew
If you are a macOS user, then flush your DNS cache by opening the Terminal application. When the application opens, type the following and press enter:
dscacheutil -flushcache
Note that you won’t find any success message popping up on your screen as it is found in Windows. However, when you run this Command, the DNS cache will flush successfully.
9. Disable IPv6
IPv6 is the newest Internet Protocol version that helps to route traffic between the internet and networks. Now, unfortunately, this could also be the reason behind the DNS server is not responding. Hence, another solution to this issue is disabling IPv6.
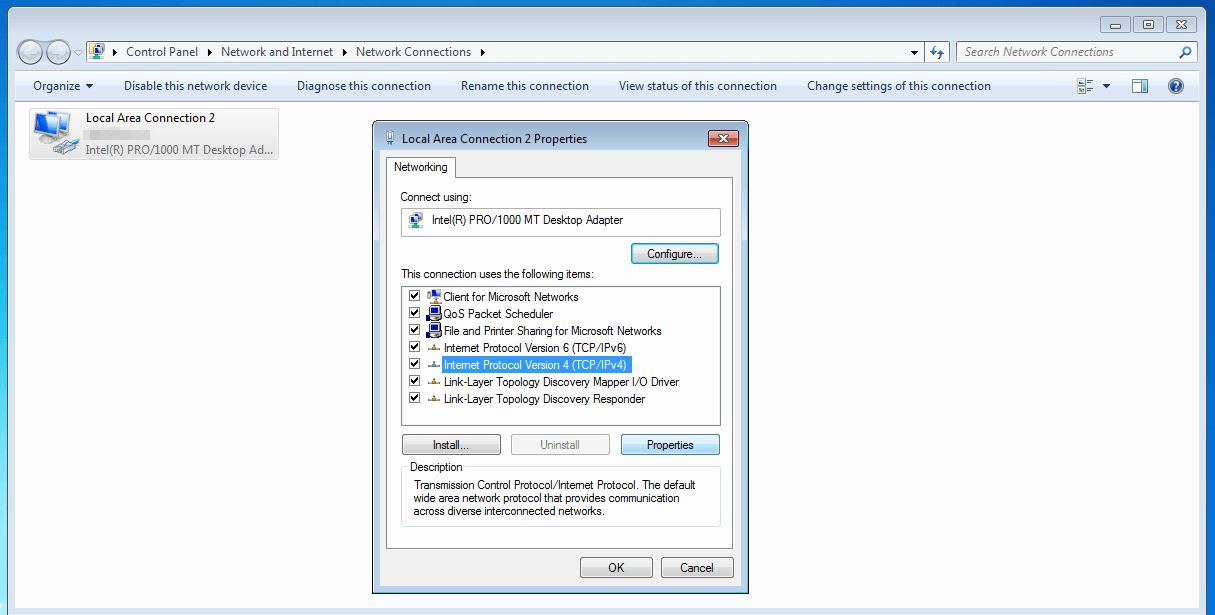
So, for doing this on your Windows, open the Network Connections Control Panel.’ Next, right-click on the current connection. A drop-down menu will occur from there select ‘Properties.’
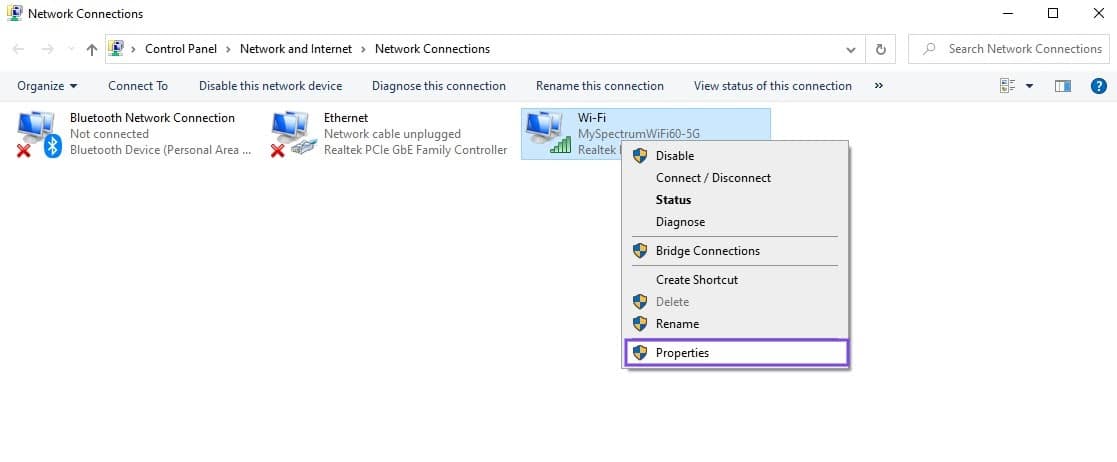
Next, the Networking tab will open. There, scroll down until you find out Internet Protocol Version 6 (IPv6/ TCP).
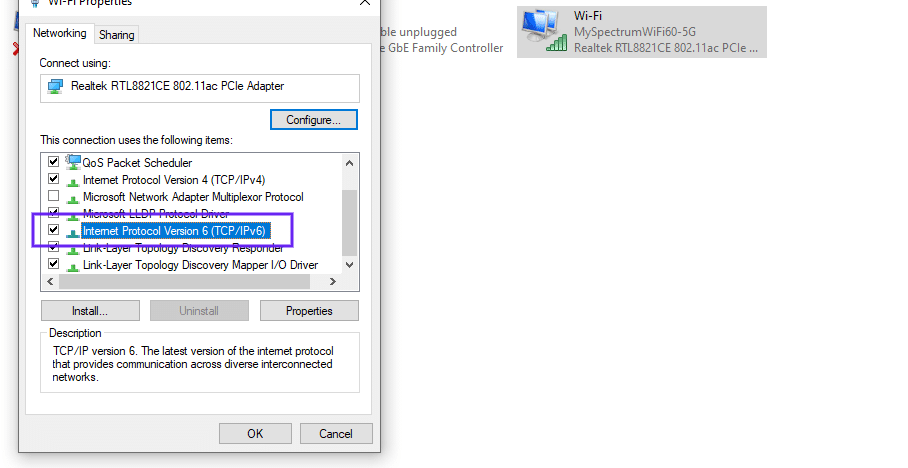
If you find it selected, then simply unselect it. Next, click OK. Now, refresh your browser, and again try reconnecting to the Internet connection.
If you use a macOS, you need first to determine what network interface you are using. For deciding this, open the Terminal application. Now, issue the following command:
networksetup -listallnetworkservices
For a wireless connection, you can disable IPv6 by typing the following command:
networksetup -setv6off Wi-Fi
For disabling it in an Ethernet connection, type the following:
networksetup -setv6off Ethernet
Hit Enter. And, finally, check your internet connection and browser. Check if you are still facing the DNS server issue. If you are still facing the issue, then you can try the following solution.
10. Selecting another DNS server
If you are still wondering how do I fix the DNS server not responding and have tried out all the solutions mentioned above and none of them worked for you, then you can try selecting another DNS server. Changing your DNS server can help you to resolve the DNS server issue.
Generally, the internet provider’s DNS server address is automatically used. But, this can turn out to be slow at certain times. Hence, you can simply change the DNS server with your desired server. You may also use a public DNS server. Google, for instance, operates a free, fast, and reliable public DNS server.
Below you will find out how you can set up a DNS server using router settings on Windows 8, 7, and 10. If the DNS server not responding to windows 10, then check out the following ways.
a) Changing the DNS server via a router
- Step 1: Accessing your router
- Open your browser. Then, access your router.
- Then, open the Windows command line. Write ‘cmd’ in the search box and press enter.
- Next, in the open tab, enter ‘ipconfig.‘ Then, copy the numbers onto the clipboard after ‘Default gateway.’
- Lastly, copy the number on your browser’s address field. Confirm it. Next, log in with relevant information.
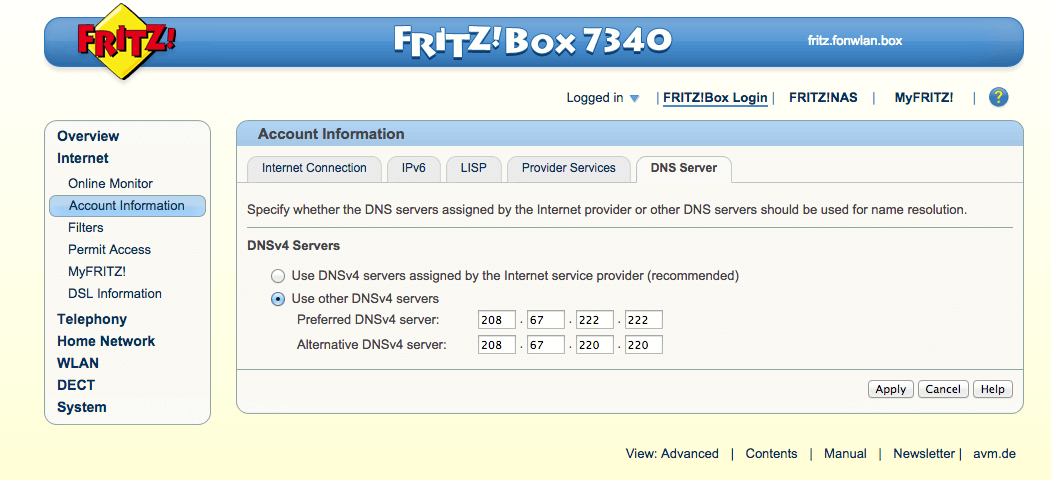
- Step 2: Setting up other DNS servers
- Firstly, choose ‘Internet.’ Then, select ‘Account Information.’
- Next, click on ‘DNS server.’
- Then, click on ‘Use other DNSv4 servers’.
- If you wish to use Google’s DNS server, e.g., write 8.8.8.8 in the boxes by ‘Preferred DNSv4 server’. Now, next to ‘Alternative DNSv4 server’, you have to write 8.8.4.4. Hence, this alternative DNS server can be used if your server fails to operate correctly.
b) Changing the DNS server on Windows 7.8 or 10
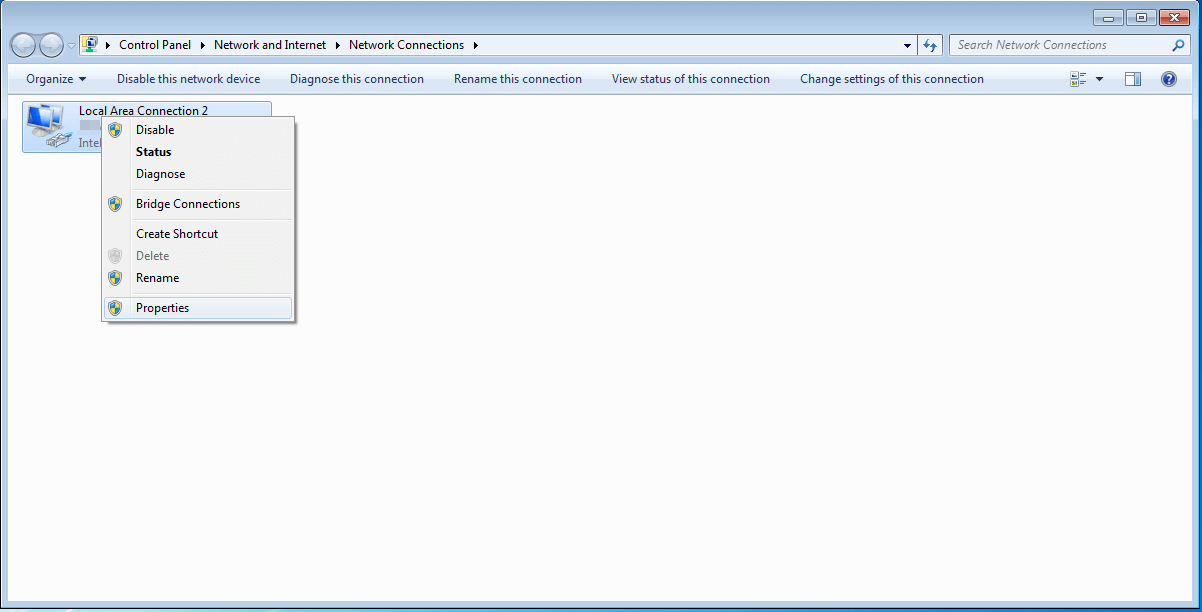
- Step 1: View your network connections
For changing the DNS server on your Windows 8, Windows 7, and Windows 10, you have first to access the network connection properties. So, first, click on the Windows icon. Now, search for ‘Network Connections.’ Now, from the menu, choose ‘View network connections. Or, you may put the command’ ncpa. cpl‘.
If you are using Windows 10, then simply right-click. Then, hover over the Windows icon and next click on ‘Network Connections.’

- Step 2: Select the appropriate network adapter
Now, for the second step, you need to select the currently used internet adapter lucidly. If you are using a wireless network, then choose WLAN. Now, if you are accessing the internet via cable, then click on the LAN adapter. So, after you have successfully identified the right connection, right-click on it. Then, select ‘Properties.’
- Step 3: Select the internet protocol
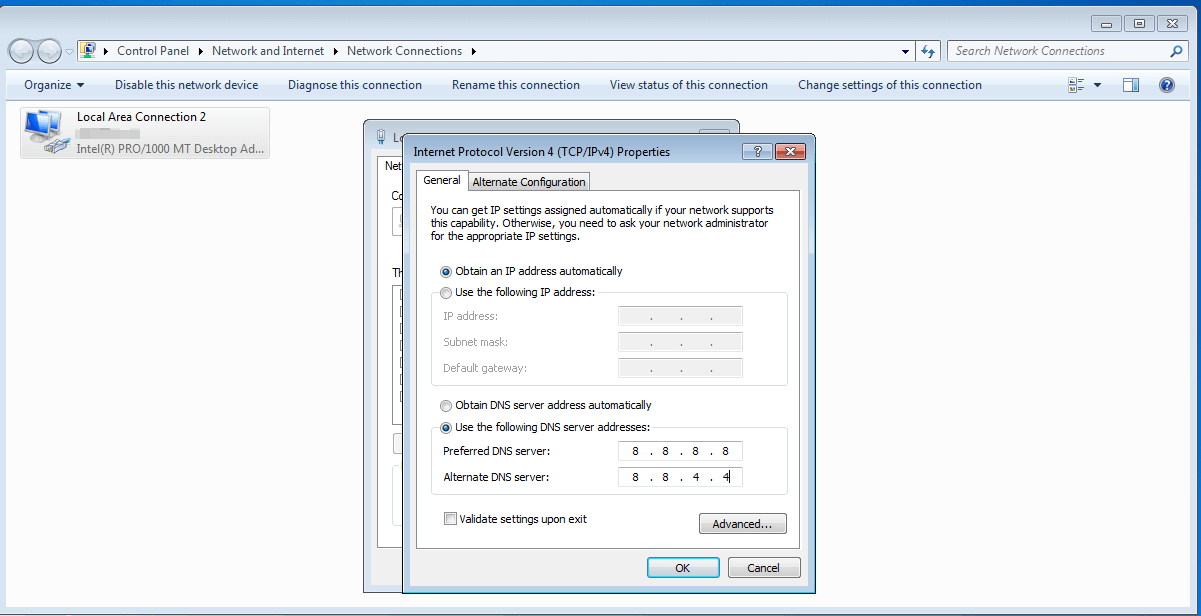
Now, you have to choose the internet protocol that you have to use. As you can see, you will find two options, Internet protocol version 6 and Internet Protocol version 4. In general, version 4 is mostly used. Select this one. Next, click on ‘Properties.’
- Step 4: Change the DNS server address
The last step is changing the DNS server. The selected defaulted options should be ‘Obtain DNS server address automatically’ and automatically ‘Obtain an IP address. Now, if this is not the case, then note the DNS server address currently in use. Next, change the server address. In case if you face any problems in the future, you can undo the changes quickly. Hence, do note the DNS server address before changing it.
If you wish to assign a DNS server address manually, click on ‘Use the following DNS server addresses.’ Then, enter alternative DNS servers’ addresses if you wish to use Google’s DNS server, type 8.8.8.8 in the preferred DNS server’ box. On the ‘Alternative DNS server’ box, write 8.8.4.4. Well, you can easily omit the information’s second part, as this part is only essential if the DNS server address faces any issue. Also, note that the IP address must remain unchanged. This is a top setting. And all the maximum settings must remain intact.
Now, click on OK to confirm the DNS server exchange.
c) Checking the DNS server
To check whether this method has successfully worked for you, you can conduct a simple test. Enter a well-known site’s URL like facebook.com. If the site opens and you can see the Facebook feed, then the DNS server issue has been resolved.
Hence, these were some of the best methods by which you can successfully solve ‘DNS server not responding. You can use any one of the ways, and it is sure to work. If one method is not working for you, you can try out the rest ten best methods for resolving the DNS server issue.
Summing Up!
If you are trying to access a website and then meet with the ‘DNS server not responding,’ we have the perfect solution. We have listed the top 10 solutions by which you can quickly solve the DNS server issues. Hence, if you fail to access your favorite site and simple methods are not helping you, then try out the methods like disabling secondary connections, restarting the router, disabling IPv6, etc. We have mentioned all the methods in detail above.