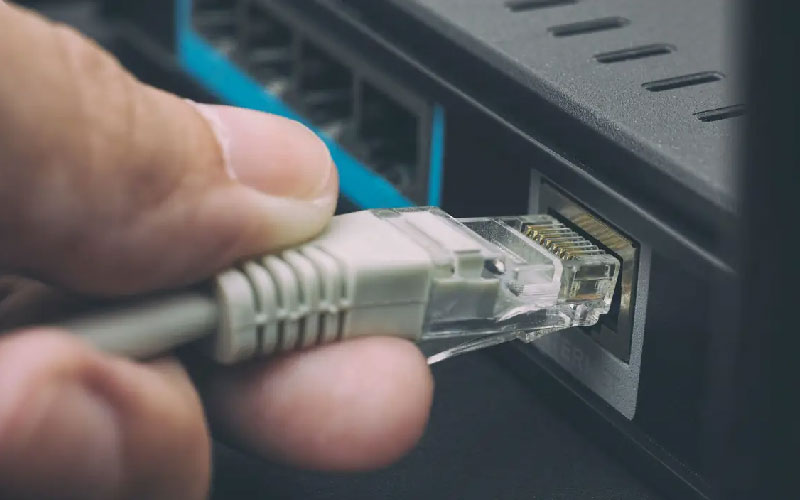
There’s hardly any day or rather moment when we spend without Internet or Ethernet. Ethernet and the Internet have become a crucial part of our lives. Thinking about a life without them is simply impossible. But what if you suddenly face an issue with your Ethernet? Is your ethernet showing “Ethernet doesn’t have a valid IP configuration”? Well, in this article we will talk about all the ways you can solve this issue.
The issue windows 10 ethernet doesn’t have a valid IP configuration when your Ethernet fails to a valid IP address from the Dynamic Host Configuration Portal or DHCP. DHCP is a network protocol allowing servers to automatically assign an IP address to your device for a specific network. Hence, consequently, the computer or the device is unable to set assign an IP address. Therefore, meaning that the computer is unable to connect to the Internet and the network.
This error is caused due to a myriad of reasons. Below we have mentioned the various reasons why the error can occur. Moreover, we have also listed how you can fix this error.
Table of Contents
When does the error occur?
So, as already mentioned, there can be a myriad of reasons why this error occurs. So, let’s check out the reasons.
- Your Ethernet does not have an IP configuration Netgear, TP-Link
Many users have reported this problem. This problem affects any kind and type of hardware network. Hence, this is not something new or unfixable. This problem mainly persists while using Netgear devices and TP-link.
- Ethernet does not contain a valid IP configuration powerline
Powerline is undoubtedly the easiest and the best way to set up a network. Now, many users using a Powerline have reported the ethernet error issue. Therefore, if you are using a Powerline, then check out how to fix the error.
- It does not have a proper IP configuration router
In most instances, the ethernet error occurs because your router is not configured correctly. So, if your router is not configured correctly, then you are sure to face this problem. Hence, you have to make certain changes and adjustments to your router’s configuration to fix the issue.
- Your Ethernet does not have a viable IP query
Now, this is simply one kind or variation of the same issue. Hence, you can solve this issue by applying the same solution. We have listed the fix below.
- Ethernet does not have a viable IP configuration Unidentified Network
You will find this error generally with unidentified networks. It comes with an Unidentified Network message. You can quickly solve the problem by following the standard solution.
- Ethernet does not have a proper connection
Now, you will find this kind of error when there is an issue with your network connection. So, you have to adjust the ethernet configuration a bit for fixing this and setting this right.
- Your Ethernet does not have a proper configuration
This message appears when there are disparities with your network configuration. So, a few minor tweaks and the problem will be easily solved.
- Ethernet does not have a proper IP address
On certain PCs, this variation appears instead of Ethernet doesn’t have a valid IP configuration Windows 10. If this error occurs on your PC, you have to resolve the IP address conflict.
- Ethernet is not working
In certain severe and significant cases, it might be that your Ethernet stops working completely. Moreover, users have reported that they could access the Wi-Fi but not the Ethernet.
- Ethernet not working on the laptop
This is another scenario. The Ethernet fails to work on a laptop. This error can affect both laptops and desktops. Many users have reported their Ethernet not working correctly while the Wi-Fi is working completely fine. So, you can solve this issue as well by following the steps mentioned below.
- Your Ethernet does not have an IP configuration
On certain occasions, the IP configuration is entirely missing. Do not worry. All you have to do is manually configure the IP address.
- Ethernet unable to connect to the Internet
It might also happen that you are unable to connect to the Internet through your Ethernet. But, users have reported they could connect to the Internet using Wi-Fi. Hence, this problem can also be solved by following the steps below.
We have mentioned why you could be facing an ethernet that doesn’t have a valid IP configuration, or Ethernet 2 doesn’t have a valid IP configuration. We are sure you can solve these issues by following the below-mentioned steps. Hence, scroll down and check out the different fixes.
How to Fix Ethernet Doesn’t Have a Valid IP Configuration
Below we have mentioned how you can quickly solve the issue Windows 10 ethernet doesn’t have a valid IP configuration. So, check out the different processes and get rid of the issue.
1. Reboot the system
You should start with disabling the fast startup feature. This feature comes in Windows 10. This allows faster recovery from shut down or hibernation. Hence, this means that your computer is going to boot up quickly. So, for disabling and turning off this feature, follow the steps below:
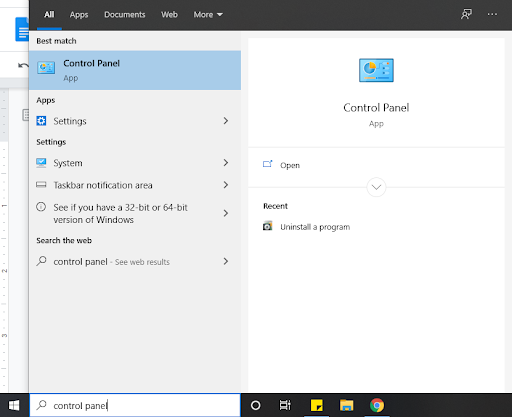
a. Firstly, go to the search bar—type “Control Panel” in the search box. You can even press “Windows + S” and enable the search feature. Now, click on the Control Panel app to launch it.
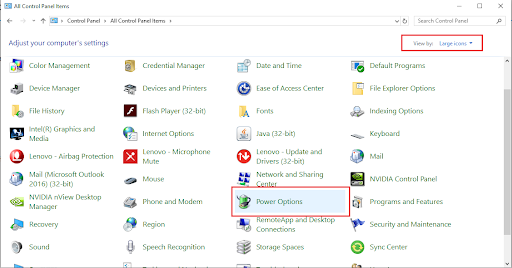
b. Next, simply set the view mode to large or small icons for viewing all the items. Next, click on “Power Options.”
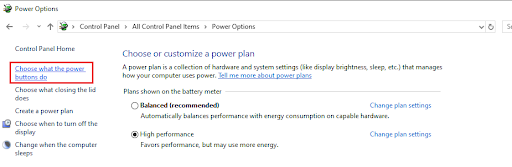
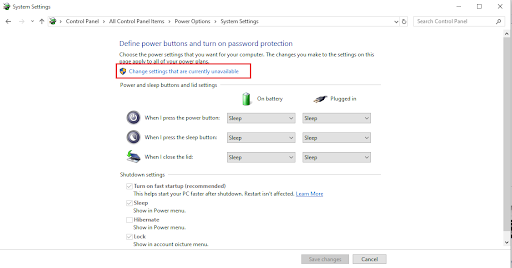
c. On the left-hand side of the windows, you will find the option “Choose what the power button does.” Then, click on it.
d. Now, click on the link “Change settings that are currently unavailable.” Note that at this point, you might have to enter an administrative password.
e. Now, simply unselect the box “Turn on fast setup (recommended). So, you will find this option under the Shutdown settings. Next, after you have unchecked the box, click on “Save Changes.” So, this will disable the fast startup feature. Hence, solving the ethernet error.
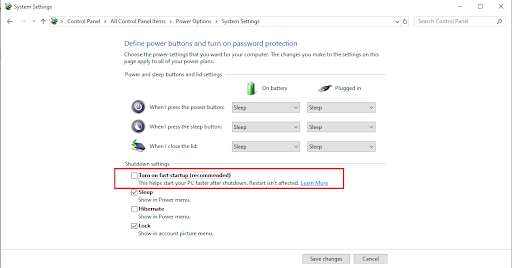
f. So, save the changes. Then, simply restart your device. After the device restarts, check whether the problem persists.
If the problem persists, then you can follow the other methods we have listed below. All the other solutions are surely going to help you.
2. Check and configure your network adapter settings
The router you are currently using automatically allocated IP addresses to each device it is connected with. This is by default. But, you can also configure the settings for assigning just one static IP address. So, you have to check whether or not this works for you to resolve the ethernet issue. So, you have to set the IP address to automatic first. Then, simply check the Internet Properties once the Internet is successfully connected.
Now, follow the instructions below:
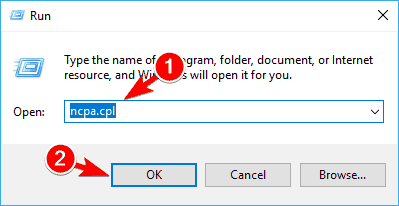
a. Simply hold the Windows key and then press R.
b. Next, in the input field, type in “ncpa. cpl“. Then, click OK.
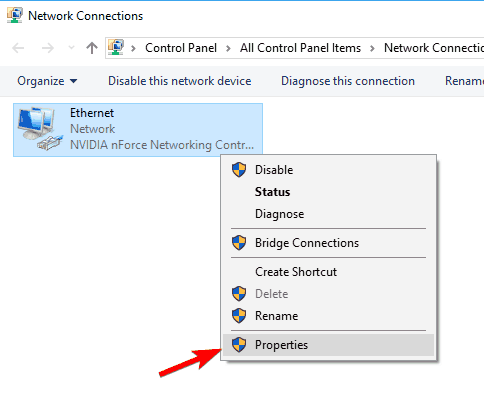
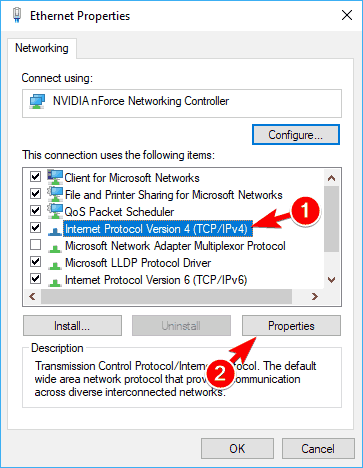
c. In the Network Connections window, simply right-click on the Network Adaptor. Then, click on Properties.
d. Now, select “Internet Protocol Version 4 (TCP/IPv4)” from the Ethernet Properties. Then, click on Properties.
e. Upon seeing the “Internet Protocol Version 4 (TCP/IPv4)”, enable the following options:
- Obtain an IP Address Automatically.
- Obtain DNS Server Address Automatically.
Manually:
If an IP address automatically and the DNS server address automatically do not work for you, you must set both of them manually. So, for doing that, follow the steps below:
- Open the connection properties. Then, click on “Internet Protocol Version 4 (TCP/IPv4)”. Next, select Properties.
- Now select “Use the following DNS server addresses” and “Use the following IP addresses.” Now, check out the image below, and simply fill in the same data on your device. Once you are done entering the data, click on OK to save changes. Moreover, if you want to check the Subnet Mask or Default gateway, you can check it on any other device. You can now easily connect to the internet connection.
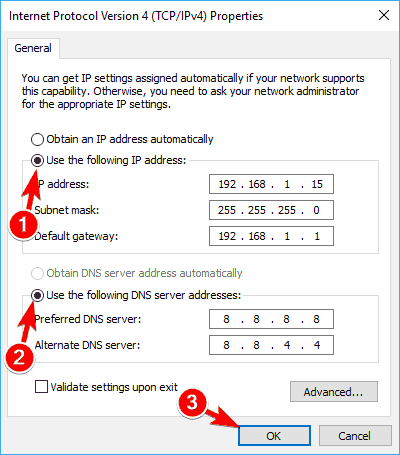
Note that we have mentioned Google’s DNS settings. So, if this fix did not work for you, you can check out the other solutions.
3. Restart your Modem, Router, and Computer
So, Ethernet’s most straightforward fix doesn’t have a valid IP configuration by restarting the affected hardware. So, start by saving all your work and progress, then closing them, and shut down your computer or laptop.
Next, follow the steps below:
a. In your taskbar, select the “Windows” button. Then, open the “Start” menu.
b. Click on the Power button. And then click on the Restart button. Now, this will automatically shut down the computer and again start it. You do not have to give any manual input.

c. Log in to your User account. Then, simply allow Windows 10 to back up.
Just like your laptop or computer, restart your modem or router as well.
- So, firstly, unplug the router or modem and keep it unplugged for few minutes. Moreover, to ensure a proper restart, wait for at least two to five minutes.
- Now, plug it in and wait for it to start. The LED lights on your router will indicate when it is ready to operate again.
- Lastly, check whether the error is resolved. Also, make sure you check the ethernet connection you are using as well. Also, try testing it by using a separate cable.
Finally, you are all set, and hopefully, the error is resolved. If still the error persists, you can scroll down and check the various other methods as well. Although this was the easiest and simplest method to fix the issue, we have mentioned some complex ones to solve the issue. So, make sure if one does not work for you, then head to another fix and try it out.
4. Update or Reinstall your Network Adapter Driver
By using the device manager, you can easily reinstall or update the network adapter driver. This is sure going to help the ethernet error. So, let’s check out the following steps:
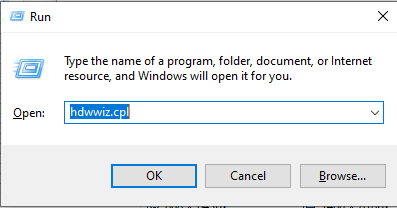
a. On the bottom left corner of your desktop or laptop, type “Device Manager” You can even press Windows + S to prompt the search box. Moreover, you can also press Windows + R and then type in “hdwwiz. cpl” in the box and then press OK.
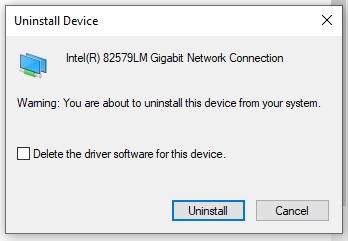
b. This is then going to bring up the device manager. Now, you can see a list of devices connected to your laptop or computer. Now, search for Network Adapters. Then, simply expand and right-click on it. Next, choose “Uninstall Device.”

c. Next, you will get a confirmation popup. Click on “Uninstall.” Also, click on the “Delete the driver software for this device” box.
d. Now, restart your PC and check whether or not the error persists.
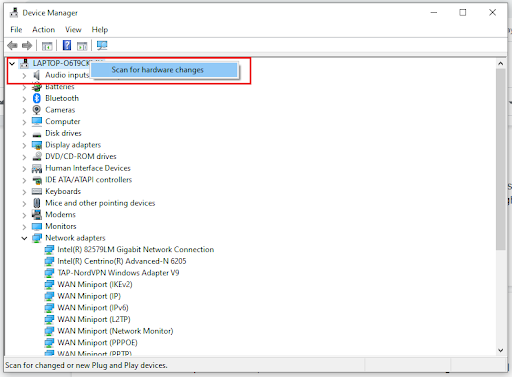
Note that if Windows is unable to uninstall devices automatically, then head back to Device Manager. Then, right-click on the computer’s name. Next, select “Scan for hardware changes.” This will allow installing and finding of missing drivers.
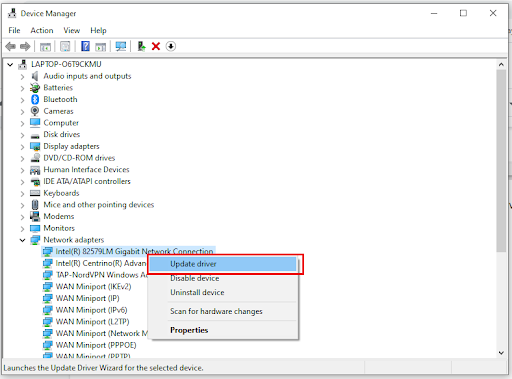
e. So, for updating the drivers, follow the same steps mentioned above. But, instead of selecting “Uninstall device,” click on “Update driver.”
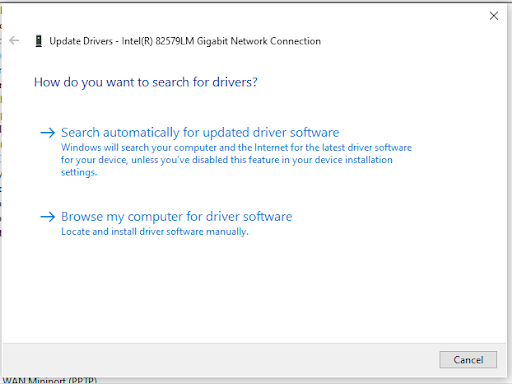
f. Next, you will find a window asking you whether you want to automatically look for an updated driver or browse your computer to look for an updated driver. So, when you select the first option, the computer will look for the driver across the computer and Internet. But, if you choose the second option, you have to do it manually.
5. Reset IP/TCP
For this solution, you will need a command prompt. You will also use the netsh command. So, this allows you to modify or display a computer’s network configuration easily. Hence, let’s take a look at how to do it:
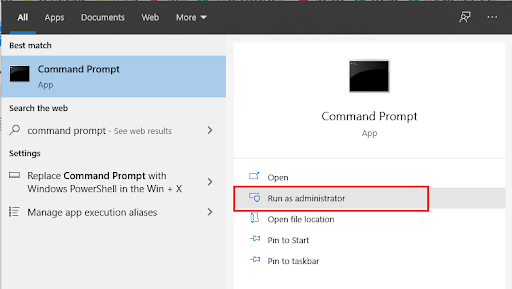
a. Press Windows + S, and then on the search box, type Command Prompt.
b. Then, right-click on “Run as Administrator.” This will open the elevated command prompt. You may even right-click on the Command Prompt icon. Then, select Run as Administrator. When it asks for your permission. Click on OK.

c. When prompted by the UAC, click on Yes. This is necessary for launching the software and will also make specific changes on your computer.
d. So, in the Elevated Command Prompt, type the following commands:
- Netch Winsock
- Reset netsh int IP reset.
Note: Press Enter after typing each command.
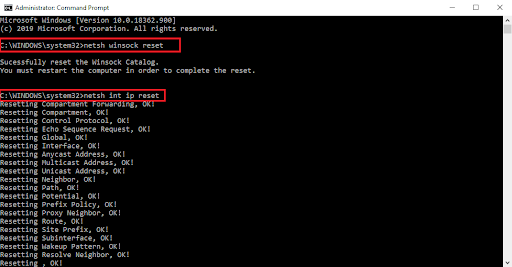
a. When you run the first command, the device will ask you whether you want to restart the computer. Ignore it for now, and type in the second command.
b. Once you are done running both the commands, simply restart your device and check whether or not Ethernet doesn’t have a valid IP configuration persists.
If the error persists, then check out the other methods as well.
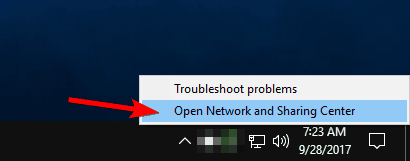
6. Disable IPv6
A lot of users have reported that they were able to solve the issue simply by disabling IPv6. So, let’s try out this method.
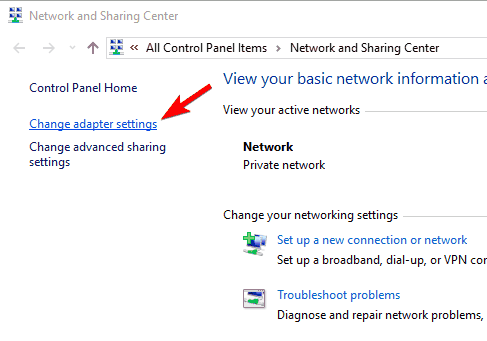
a. Firstly, open “Open Network and Sharing Center.” You can easily do it by clicking on the network icon and choosing “Open Network and Sharing Center.”
b. When it opens, click and select “Change Adapter Settings.” You will find it in the left pane.
c. Then, locate your network connection. Right-click on it and then choose “Properties.”
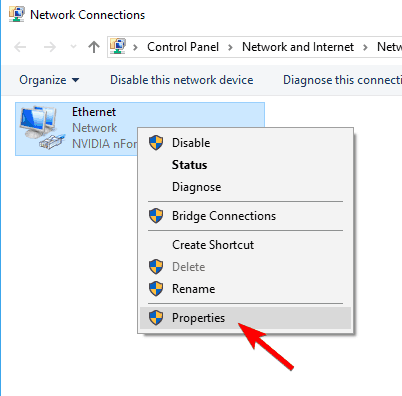
d. Locate the Internet Protocol Version 6 (IPv6/ TCP). Then, uncheck it. Next, click on OK to save changes.
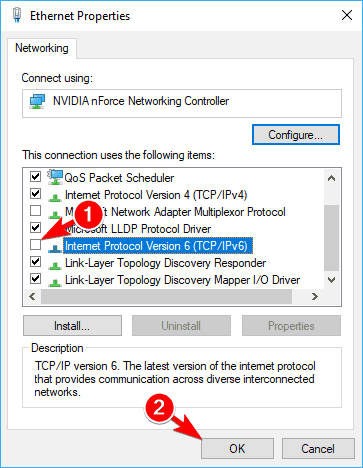
e. Doing this will indeed disable IPv6. Then, you can restart the computer and check if the ethernet error is still there.
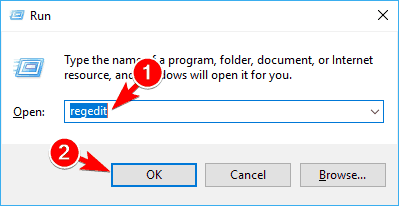
You can disable IPv6 through Registry Editor as well. Follow the following steps to do it:
a. Press Windows + R and then type in “regedit” Press Enter.
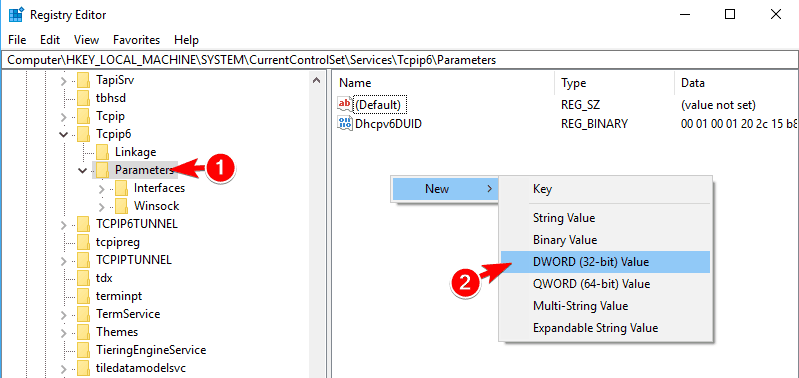
b. When the Registry finally opens, navigate to
HKEY_LOCAL_MACHINESYSTEMCurrentControlSetServicesTcpIP6Parameters
On the right-pane, in the space, choose New > DWORD (32-bit) Value. Type in “Disabled Components” as the new name of Dword.
c. Then, double click on Disabled Components for opening the properties. Then, change Value Data to “ffffffff“ and then save changes.
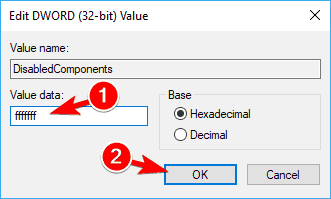
So, after doing this, your IPv6 must be disabled. If you want to enable it again, delete “Disabled Components.”
7. Clear the Network Cache
The final solution to solve this error is clearing the network cache. So, here you have to use ipconfig in the Elevated Command Prompt. When you use it, you can quickly clear the DNS client resolver cache. Moreover, you can also renew the DHCP configuration.
a. On the left-hand bottom of your screen, type Command Prompt. Click on Run as Administrator.
b. Now, on the Elevated Command Prompt, type the commands:
- ipconfig/ release
- ipconfig/ flushdns
- ipconfig/ renew
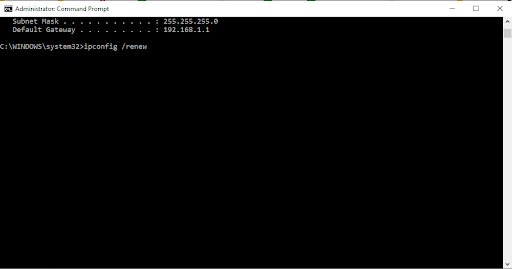
c. After entering the commands, simply restart your computer. Your ethernet error should be resolved.
Hence, these were the fixes for solving the ethernet issues. If one method does not work for you, then check out the other method.
Final Words!
We hope we could help you find a fix for “Ethernet doesn’t have a valid IP configuration” All the methods are verified and have worked wonders for many users. If the methods above are unable to help you, then contact your ISP or Internet Service Provider and check if there is any issue from their end.